Difference between revisions of "Word-footer"
From learnnshare
Suttinee.m (Talk | contribs) (Created page with "<!------------เรียนรู้และแชร์การใช้งานโปรแกรม Word---------------------> <table width="100%" border="0" bgcolor="...") |
Suttinee.m (Talk | contribs) |
||
| Line 2: | Line 2: | ||
<table width="100%" border="0" bgcolor="#f6f6f6" cellspacing="0" cellpadding="0"> | <table width="100%" border="0" bgcolor="#f6f6f6" cellspacing="0" cellpadding="0"> | ||
<tr align="left" valign="bottom"> | <tr align="left" valign="bottom"> | ||
| − | <th colspan="2"><strong><span style="font-size: 125%; color: blue;">[[ File:ict-word-icon.png|border|35px ]] เรียนรู้และแชร์การใช้งานโปรแกรม Word</span> > <font color="magenta"> | + | <th colspan="2"><strong><span style="font-size: 125%; color: blue;">[[ File:ict-word-icon.png|border|35px ]] เรียนรู้และแชร์การใช้งานโปรแกรม Word</span> > <font color="magenta">การกำหนดเลขหน้าตรงส่วนท้ายกระดาษ (Footer)</font></strong><br /><br /></th> |
</tr> | </tr> | ||
<tr valign="top" align="center"> | <tr valign="top" align="center"> | ||
| − | <td>[[ File:word- | + | <td>[[ File:word-footer.png||center]]</td> |
| − | <td align="left"><font color="blue"><u> | + | <td align="left"> |
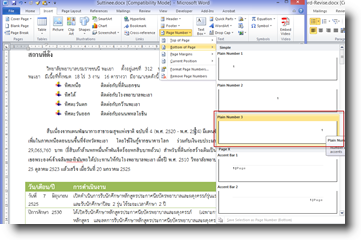
| − | • | + | • เลื่อนเคอร์เซอร์ไปที่หน้าคำว่า “ประวัติความเป็นมา” |
| − | + | • คลิกที่แท็บ Insert | |
| − | + | • คลิกที่ลูกศรชี้ลงของไอคอน Page Number แล้วเลื่อนเลือกรายการ Bottom of Page และเลือกรายการ Plain Number 3 | |
| − | • คลิกปุ่ม | + | </td> |
| + | </tr> | ||
| + | |||
| + | <tr valign="top" align="center"> | ||
| + | <td>[[ File:word-footer.png||center]]</td> | ||
| + | <td align="left"> | ||
| + | • เลื่อนเคอร์เซอร์ไปทางด้านซ้ายโดยกดปุ่ม Backspace และเพิ่มข้อมูลตรงด้านซ้าย ให้เป็นชื่อของตนเอง | ||
| + | เช่น โดย .................................... และกดปุ่ม Tab ให้หน้าที่อยู่ทางด้านขวามือ | ||
| + | • เลื่อนเคอร์เซอร์ไปตรงคำว่า “โดย” พิมพ์เครื่องหมาย – 3 ครั้ง แล้วเคาะ Enter เป็นการเพิ่มเส้นคั่น | ||
| + | |||
| + | <font color="blue"><u>การกำหนดรูปแบบของเลขหน้า</u></font> | ||
| + | • คลิกที่แท็บ Design ของ Header & Footer Tools | ||
| + | • คลิกปุ่ม Link to Previous ไม่ให้มี highlight (ปุ่มจะกลายเป็นสีเทา) | ||
</td> | </td> | ||
</tr> | </tr> | ||
Revision as of 08:56, 14 January 2016
สร้างโดย: Suttinee.m (talk) 09:07, 5 January 2016 (UTC) Program::Word Topic::footer
