Difference between revisions of "GForm-create"
From learnnshare
Suttinee.m (Talk | contribs) |
Suttinee.m (Talk | contribs) |
||
| Line 2: | Line 2: | ||
<table width="100%" border="0" bgcolor="#f6f6f6" cellspacing="0" cellpadding="0"> | <table width="100%" border="0" bgcolor="#f6f6f6" cellspacing="0" cellpadding="0"> | ||
<tr align="left" valign="bottom"> | <tr align="left" valign="bottom"> | ||
| − | <th colspan="2"><strong><span style="font-size: 125%; color: blue;">[[ File:ict-word-icon.png|border|35px ]] เรียนรู้และแชร์การใช้งาน Google Form</span> <font color="magenta">เริ่มต้นสร้างแบบประเมินออนไลน์</font></strong><br /><br /></th> | + | <th colspan="2"><strong><span style="font-size: 125%; color: blue;">[[ File:ict-word-icon.png|border|35px ]] เรียนรู้และแชร์การใช้งาน Google Form</span> > <font color="magenta">เริ่มต้นสร้างแบบประเมินออนไลน์</font></strong><br /><br /></th> |
</tr> | </tr> | ||
<tr valign="top" align="center"> | <tr valign="top" align="center"> | ||
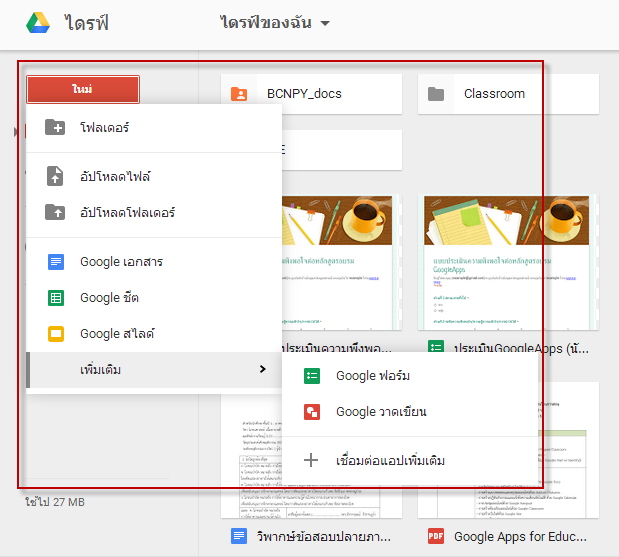
| − | <td>[[ File: | + | <td>[[ File:gform-new.png||center||250]]</td> |
<td align="left"><font color="blue"><u>1.การเปิดใช้งาน Google Form</u></font> | <td align="left"><font color="blue"><u>1.การเปิดใช้งาน Google Form</u></font> | ||
| − | • จากหน้าจอหลักของ GoogleApps ให้คลิกที่ปุ่ม 9 จุด แล้วคลิกที่ปุ่มไดร์ฟ ( ) จะปรากฏหน้าจอของ Google ไดร์ฟ ดังรูป | + | • จากหน้าจอหลักของ GoogleApps ให้คลิกที่ปุ่ม 9 จุด แล้วคลิกที่ปุ่มไดร์ฟ ( [[ File:gdrive-icon.png||center||10]] ) จะปรากฏหน้าจอของ Google ไดร์ฟ ดังรูป |
• ให้คลิกที่ปุ่มใหม่ (New) แล้วเลื่อนมาที่รายการ “เพิ่มเติม” | • ให้คลิกที่ปุ่มใหม่ (New) แล้วเลื่อนมาที่รายการ “เพิ่มเติม” | ||
| − | • แล้วคลิกเลือกรายการ | + | • แล้วคลิกเลือกรายการ [[ File:gform-icon.png||center||10]] “Google ฟอร์ม (Form)” |
</td> | </td> | ||
</tr> | </tr> | ||
Revision as of 08:51, 5 January 2017
สร้างโดย: Suttinee.m (talk) 09:07, 5 January 2017 (UTC) Program::GForm Topic::create

