Difference between revisions of "Excel-copy-paste"
From learnnshare
Suttinee.m (Talk | contribs) |
Suttinee.m (Talk | contribs) |
||
| (One intermediate revision by the same user not shown) | |||
| Line 2: | Line 2: | ||
<table width="100%" border="0" bgcolor="#f6f6f6" cellspacing="0" cellpadding="0"> | <table width="100%" border="0" bgcolor="#f6f6f6" cellspacing="0" cellpadding="0"> | ||
<tr align="left" valign="bottom"> | <tr align="left" valign="bottom"> | ||
| − | <th bgcolor="#cce4fb"><strong><span style="font-size: 125%; color: blue;">[[ File:ict-excel-icon.png|border|35px ]] เรียนรู้และแชร์การใช้งานโปรแกรม Excel</span> > <font color="magenta"> | + | <th bgcolor="#cce4fb"><strong><span style="font-size: 125%; color: blue;">[[ File:ict-excel-icon.png|border|35px ]] เรียนรู้และแชร์การใช้งานโปรแกรม Excel</span> > <font color="magenta">การคัดลอกข้อมูล (Copy - Paste) และการแปลงจากคอลัมน์เป็นแถว (Transpose)</font></strong><hr /></th> |
</tr> | </tr> | ||
<tr valign="top" align="center"> | <tr valign="top" align="center"> | ||
<td align="left"> | <td align="left"> | ||
| − | + | 1. การคัดลอกข้อมูล (Copy -Paste) | |
| − | + | [[ File:excel-copy-paste.png|center|700px ]] | |
| − | + | ||
| − | + | ||
| − | + | ||
| − | + | ||
| − | + | ||
| − | + | ||
| − | + | ||
| − | [[ File:excel- | + | |
</td> | </td> | ||
</tr> | </tr> | ||
| Line 22: | Line 14: | ||
<tr valign="top" align="center"> | <tr valign="top" align="center"> | ||
<td align="left"> | <td align="left"> | ||
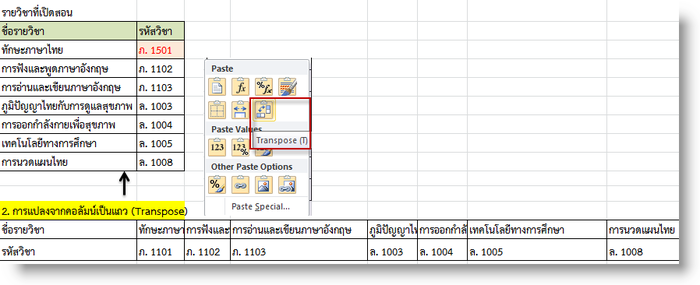
| − | + | 2. การแปลงจากคอลัมน์เป็นแถว (Transpose) | |
| − | + | • เลือกช่วงข้อมูลที่ต้องการ แล้วคลิกเมาส์ขวา เลือกคำสั่ง Copy | |
| − | + | • เลือกตำแหน่งวางข้อมูล แล้วคลิกเมาส์ขวา เลือก Paste Special > Transpose | |
| − | + | [[ File:excel-transpose.png|center|700px ]] | |
</td> | </td> | ||
</tr> | </tr> | ||
Latest revision as of 08:10, 4 February 2016
สร้างโดย: Suttinee.m (talk) 09:07, 5 January 2016 (UTC) Program::Excel Topic::copypaste

